
Recipe for replicating the test shown in the video
The 200 Day Moving Average indicator was used in the video to try to outperform the SPY ETF. The exact setup steps are shown here so that you can reproduce the results and modify the test to try other systems.
The Symbol List
We could have used a pre-existing list such as the High Probability ETF Trading list which contains 20 symbols including SPY, and then placed a check-mark next to SPY only. however, to make repeated testing easier we created a brand-new list containing only SPY and named it SPY.txt.
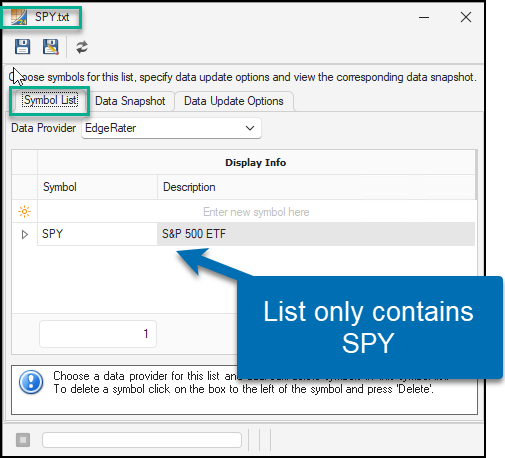
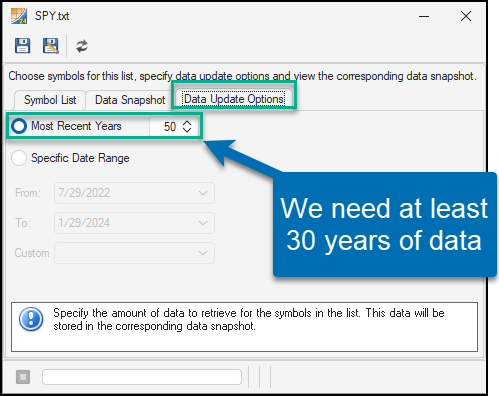
This test involved running on the entire 30 year history of the SPY ETF and so we set the symbol list up to ensure that it contains enough data.
The Scripts
There are 3 scripts used in video:
MA200_SLOPE
A visual indicator designed to be placed in a lower chart area to show the slope of the moving average and indications whenever the slope has changed from a positive to a negative value.
// The 200 period Moving Average
MA200:= MA(C, 200);

// The slope of the 200 period Moving Average
SLOPE200: 100* RORPCT(MA200, 2);

// A slope trough is detected whenever the slope crosses up through 0
SLOPE_TROUGH: CROSS(SLOPE200, 0),colorgreen;

// A slope peak is detected whenever the slope crosses down through 0
SLOPE_PEAK: -CROSS(0, SLOPE200),colorred;
This script produces the following output:
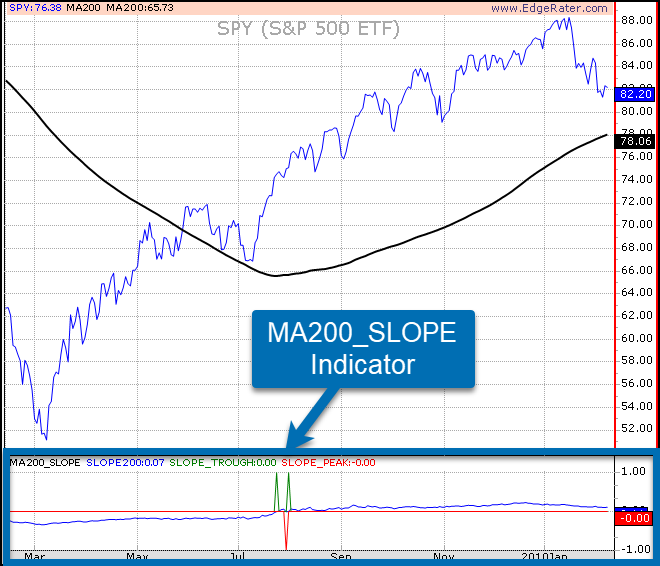
The blue line of the indicator shows the actual slope which is the 2 bar rise-over-run expressed as a percentage (RORPCT). It also shows the green +1 values whenever the slope crosses the 0 value from below and a red -1 value whenever the slope crosses the 0 value from above. These are the points when the moving average starts to turn from down to up and up to down, i.e., the troughs and peaks.
MA200_TROUGH
A script that produces a signal (event) whenever a trough is detected in the moving average. It’s very similar to the SLOPE detection indicator except it only detects a trough and it assigns it to the EVENT output.
MA200:= MA(C, 200);

SLOPE200: 100 * RORPCT(MA200, 2);
EVENT: CROSS(SLOPE200, 0);
This script is intended to be used in the Entries And Exits section of EdgeRater, specifically to generate entry events.

MA200_PEAK
A script that produces a signal (event) whenever a peak is detected in the moving average. It’s very similar to the SLOPE detection indicator except it only detects a peak and it assigns it to the EVENT output. Also, in the slope detection script the peak is assigned a negative value so that it can be seen below the zero line and not confused with the green trough signals. However here we need a +1 value for the event and so we do not apply the -1 multiplier.
MA200:= MA(C, 200);

SLOPE200: 100 * RORPCT(MA200, 2);
EVENT: CROSS(0, SLOPE200);
This script is intended to be used in the Entries And Exits section of EdgeRater, specifically to generate exit events.

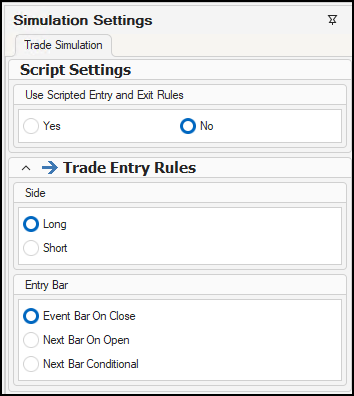
The Trade Simulation
After generating the entry and exit events the next step was to configure a trade simulation that entered a trade whenever an entry event was present and exited the trade whenever an exit event was present.
The Trade Simulation tab in EdgeRater is the place to set that up.

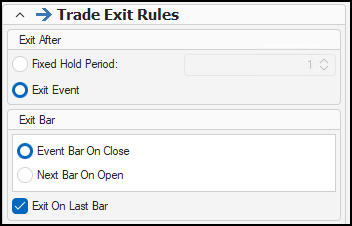
The simulation was configured to enter at the close of the entry event bar and exit at the close of the exit event bar.
The simulation was also set to use a fixed initial equity (more on that later) and to trade 100% equity per trade. We know that after an entry event an exit event must occur before a new entry event can occur and so we didn’t have to worry about the Max Open Positions or Allow Duplicates flag, there will only ever be at most one trade on at any time.
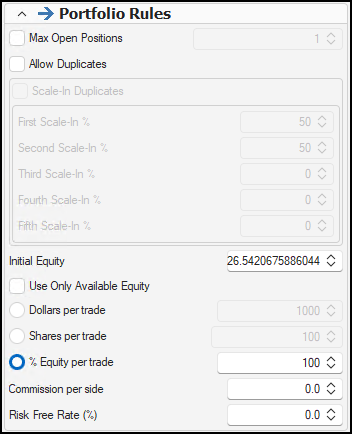
Notice that the Initial equity is set to a very precise decimal number (26.5420675886044).
The reason for this is to enable the comparison to SPY so that both SPY and the daily equity can be plotted on the same y-axis (show on primary axis).

SPY is a proxy for the Buy and Hold simulation. The initial equity value is the close price of SPY on the date the system made its first trade and can be found by popping out the simulation results and examining the Entry price cell of the first trade. You would need to run the simulation with a random initial equity (say $1000) to start with before you can find the value of SPY on the first trade date and run it again with that value.
If you chose not to do this step you would still be able to plot the SPY comparison on the daily equity chart but it would be plotted on a secondary y-axis with its own scaling and so would not allow you to do a true value for value visual comparison of the results. For instance you would not see the exact points on the chart where the system outputs cross and start to diverge. If the daily equity and SPY are plotted on 2 separate y-axes you will visually see that the plots start and end at the same point due to individual axis scaling.

Verify
How do you know if you have set everything up correctly? The first place to look is the Trade List. It is the primary information produced by the trade simulation. All other charts and statistics are based on the trade list. Go to your trade list and make sure your first entries are the same as here:
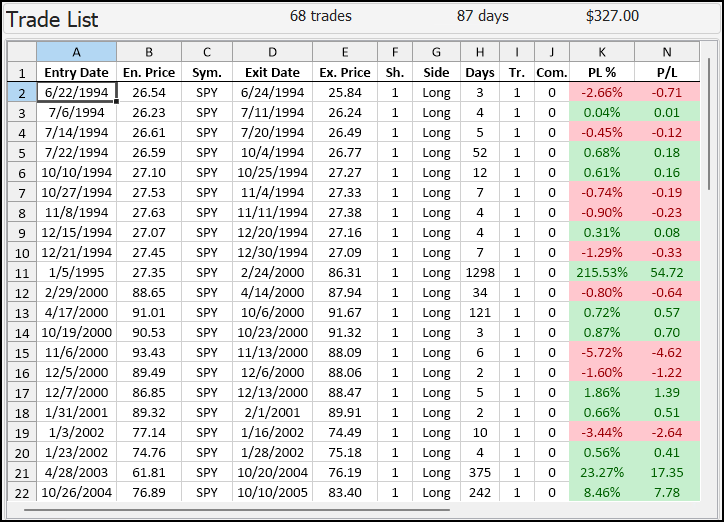
Note that your final result ($327) may not be the same as in the above image because you will not be using the same end-date for the simulation as in the video. Your results will include more recent data. However, the first entries from 1994 all the way through to Jan 2024 should be the same as in the video.
If you find that your list is not starting on 6/22/1994, check that your symbol list is configured to include at least 30 years of data (the default is 10).
If you find that in the Days column you have 1 for all trades, make sure you set your Trade Exit Rules to be Exit After Exit Event. The default is to exit after a fixed hold period of 1 day.
To verify that the trades are entering and exiting at the correct times, double click on a trade to view a chart. Turn on Chart Annotations and make sure to add the 200MA indicator and 200MA_SLOPE indicator to the chart. Use the indicators to visually verify your simulation is entering and exiting correctly.
Here, I double clicked on the 5/18/2020 trade and saw the following chart:

Thought Experiment
If you are trying to think of technical indicators that could be used to beat a buy and hold strategy remember that it might be possible to succeed on one particular chart but it might not work on every chart. Imagine if you had an indicator that could work on every chart, then why not apply that indicator to the chart produced by the equity curve to get a better equity curve. Obviously you would not be able to continue this process indefinitely and so there must exist charts that are not possible to be beaten. Perhaps a perfectly straight flat or upward sloping line is the ultimate unbeatable chart?
Summary
The video How Difficult Is It To Beat the S&P500 Index explored if it was possible to beat a SPY ETF buy and hold strategy by using the slope of the 200 day simple moving average. This post details the recipe of how to set up and run that exact test for yourself using EdgeRater. You can follow this recipe with the free trial of EdgeRater PRO.
Make sure you are signed up for our free email newsletter to receive more useful tips on trade simulation. We run regular free webinars too, if you are on the email newsletter list you will be notified and invited to attend.
Please remember to Like the video and Subscribe to our YouTube channel if you found this information helpful. Add any comments to the YouTube video, we read them all.